Introduction
You love plants. You’ve accumulated them gradually—a monstera from the nursery, a pothos from your friend’s propagation spree, a fiddle leaf fig that caught your eye at the farmer’s market. But when you step back and look at your apartment, something feels… off. Your plant collection, despite being full of healthy, beautiful specimens, looks more like a chaotic jungle than the serene botanical haven you see on Instagram. Pots crowd windowsills, plants compete for attention, and the overall effect is cluttered rather than curated.
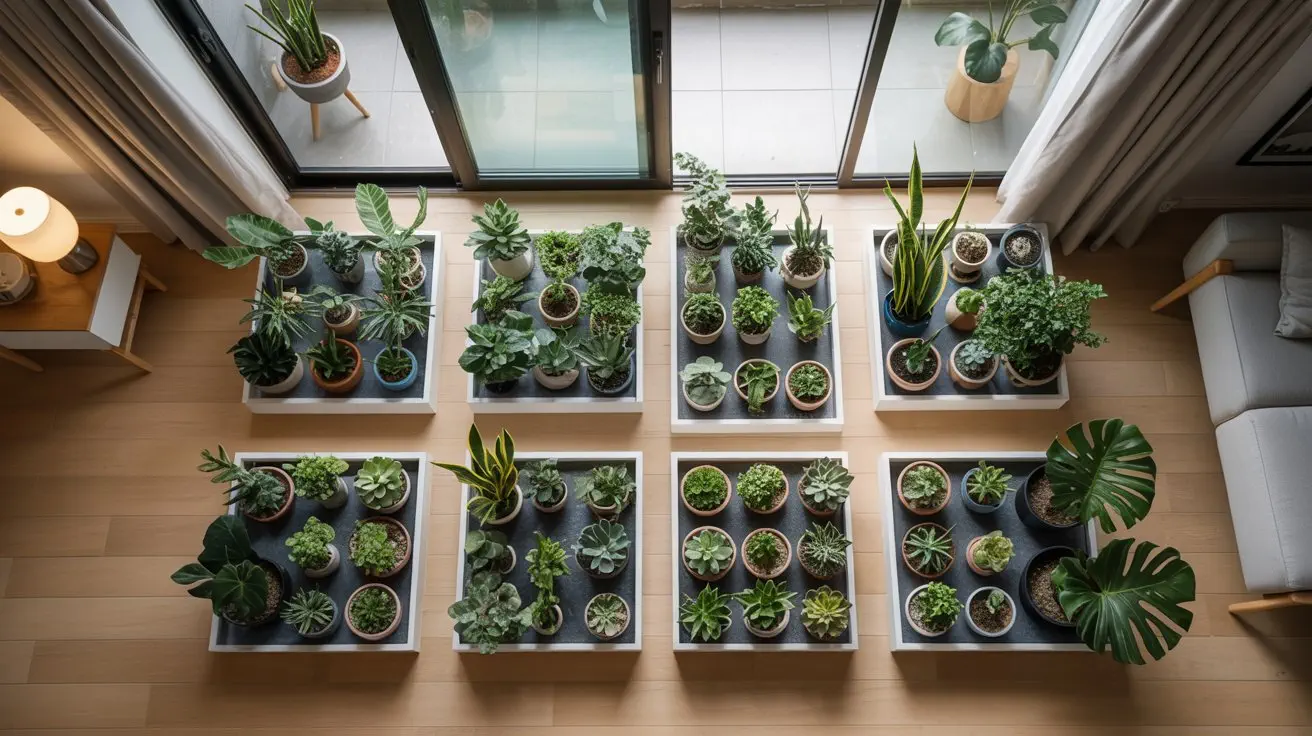
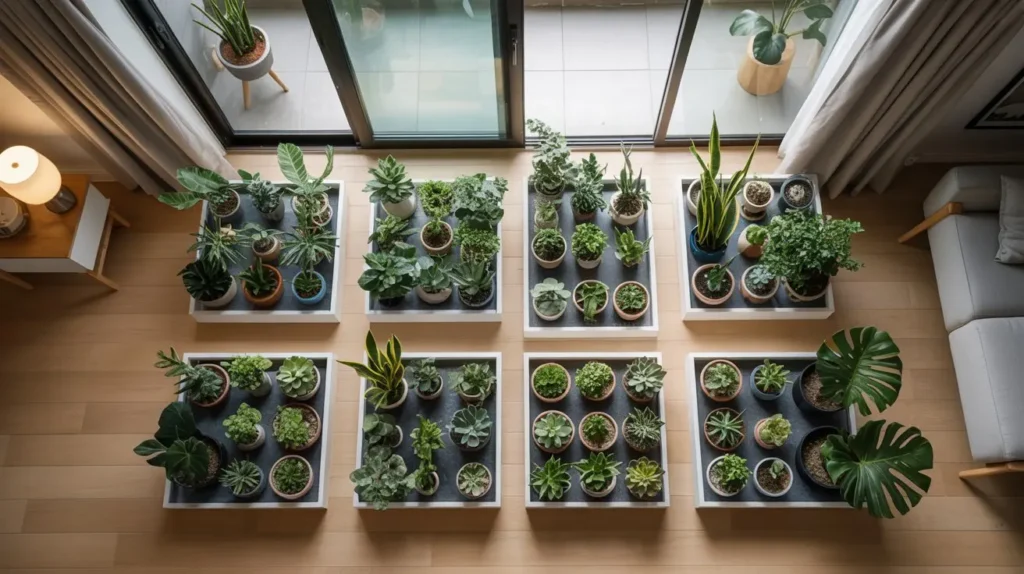
Enter botanical bento design—the organizing principle that’s transforming apartment gardening in 2026. Inspired by the Japanese art of bento box arrangement, this approach treats your living space like a carefully composed work of art, where each plant occupies an intentional zone, creating visual harmony through organized layers. Think of it as Marie Kondo meets jungle vibes: maximalist in plant quantity but minimalist in execution.
The benefits go beyond aesthetics. Botanical bento design optimizes your space, makes maintenance easier through zone-based care routines, and creates Instagram-worthy moments in every corner of your apartment. Ready to transform your plant chaos into composed botanical beauty?
What is Botanical Bento Design?
The Japanese Bento Philosophy Applied to Plants
Traditional bento boxes are marvels of compartmentalized beauty. Each ingredient occupies its own space, colors are carefully balanced, and variety exists within a unified whole. The rice doesn’t mix with the pickles; the protein stands distinct from the vegetables. Yet everything works together to create a satisfying, complete meal that’s as visually appealing as it is functional.
Botanical bento design applies these same principles to your apartment plant collection. Instead of the “more is more” approach of traditional jungle rooms or the stark minimalism of single-statement-plant styling, botanical bento embraces organized maximalism. Each plant or plant grouping occupies a defined zone, creating visual compartments that guide the eye through your space. Layers build upon each other vertically—from floor to ceiling—while horizontal zones divide your apartment into distinct botanical “courses.”
This differs fundamentally from traditional plant styling approaches. A typical “plant wall” crowds greenery together without intentional spacing. A “jungle room” prioritizes density over organization. Botanical bento, by contrast, celebrates both abundance and breathing room, creating a sense of luxurious organization that feels both abundant and zen.
Table: Bento Design Principles vs Traditional Plant Styling
| Principle | Botanical Bento | Traditional Approach |
|---|---|---|
| Organization | Defined zones with clear boundaries | Random placement based on available surfaces |
| Visual Flow | Intentional layers from ground to ceiling | Organic clustering without vertical planning |
| Maintenance | Zone-specific care routines | One-size-fits-all watering and feeding |
| Space Usage | Strategic vertical + horizontal layering | Surface-dependent placement |
| Color Palette | Curated pot selection (60-30-10 rule) | Accumulated mismatched containers |
| Plant Selection | Grouped by light, water, and aesthetic needs | Individual purchases without overall plan |
Why It Works in Small Apartments
Small apartment dwellers face unique challenges: limited floor space, varying light conditions, and the need for every square foot to serve multiple purposes. Botanical bento design addresses these constraints brilliantly.
By embracing vertical layering, you multiply your growing space without sacrificing valuable floor area. A single corner can host ground-floor statement plants, mid-level collections on stands, eye-level wall-mounted planters, and trailing varieties cascading from above—creating a four-story botanical high-rise in just a few square feet.
The compartmentalized approach also prevents visual overwhelm. In a small space, too many plants competing for attention can make rooms feel cluttered and chaotic. By organizing your collection into distinct zones and layers, you create focal points that draw the eye deliberately through your space, making it feel larger and more intentional rather than cramped.
Finally, the bento system makes maintenance dramatically easier. When plants are grouped by similar care needs within defined zones, you can develop efficient watering and feeding routines instead of tracking individual plant requirements across your entire apartment.
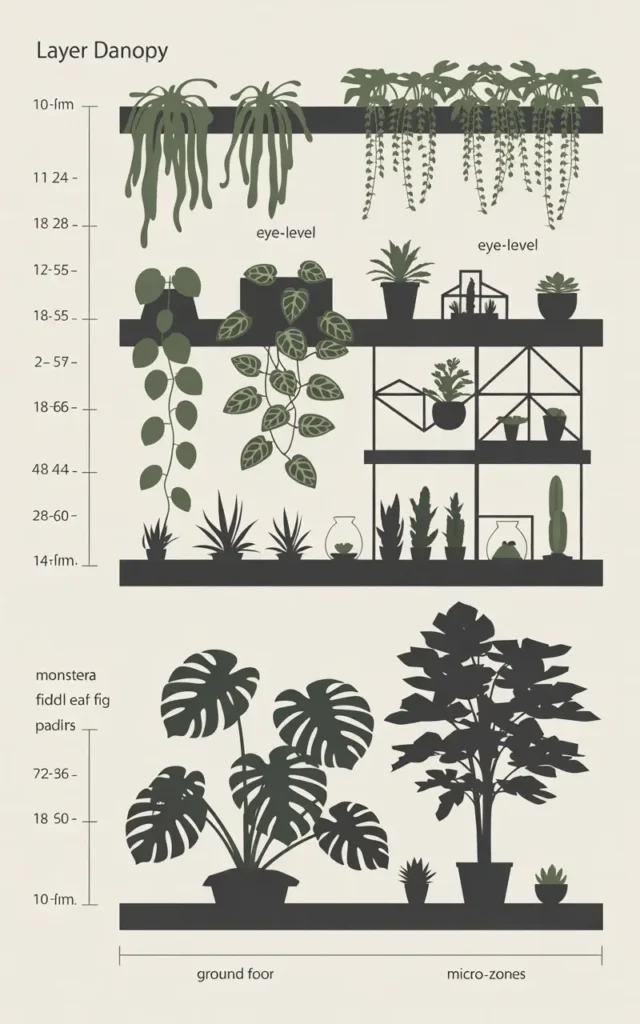
The 5 Essential Layers of Botanical Bento Design
The magic of botanical bento happens through intentional layering. Each of the five layers serves a specific function, and together they create a complete, balanced botanical composition.
Layer 1 – Ground Floor (Foundation Plants)
Your ground floor layer establishes the foundation of your entire design. These are your statement plants: the large, architectural specimens that anchor each zone and provide a height reference point for everything that follows.
Ideal Ground Floor Plants:
- Monstera deliciosa: Dramatic split leaves, reaches 6-8 feet indoors
- Bird of Paradise: Architectural vertical form, 5-7 feet
- Fiddle Leaf Fig: Sculptural branching, 6-10 feet
- Rubber Plant: Bold, glossy foliage, 6-10 feet
- Dracaena marginata: Spiky, palm-like texture, 6-8 feet
The key to ground floor success is giving these plants room to breathe. In a typical apartment zone, limit yourself to 1-3 ground floor plants, spaced 3-4 feet apart. They should feel substantial without crowding the zone. Place them in corners, flanking furniture, or as living room dividers.
Quick Reference:
| Plant Type | Mature Height | Light Needs | Spacing |
|---|---|---|---|
| Monstera | 6-8 ft | Bright indirect | 3-4 ft apart |
| Bird of Paradise | 5-7 ft | Bright indirect to direct | 4-5 ft apart |
| Fiddle Leaf Fig | 6-10 ft | Bright indirect | 4-5 ft apart |
| Rubber Plant | 6-10 feet | Medium to bright | 3-4 ft apart |
Layer 2 – Mid-Level (The Workhorse Zone)
This is your most versatile layer—the 18-36 inch height zone where most of your plant collection will live. Mid-level plants occupy plant stands, benches, side tables, floating shelves, and other elevated surfaces, creating the visual “meat” of your botanical bento.
The secret to mid-level success is mixing textures and forms while maintaining care compatibility. Pair broad-leafed plants with fine, delicate foliage. Combine upright growers with slight cascaders. Create visual rhythm through repetition—for example, three different plants in identical white pots create cohesion even with varied foliage.
Ideal Mid-Level Plants:
- Pothos varieties: Easy care, slight trailing habit
- Calathea: Patterned foliage adds visual interest
- Peperomia: Compact, diverse leaf shapes
- Chinese Evergreen: Variegated options, low maintenance
- Small palms: Adds height variation within the layer
Aim for 5-8 mid-level plants per zone, arranged in staggered heights. Use plant stands of varying sizes (8″, 10″, 12″ heights) to create subtle elevation changes that prevent visual monotony.
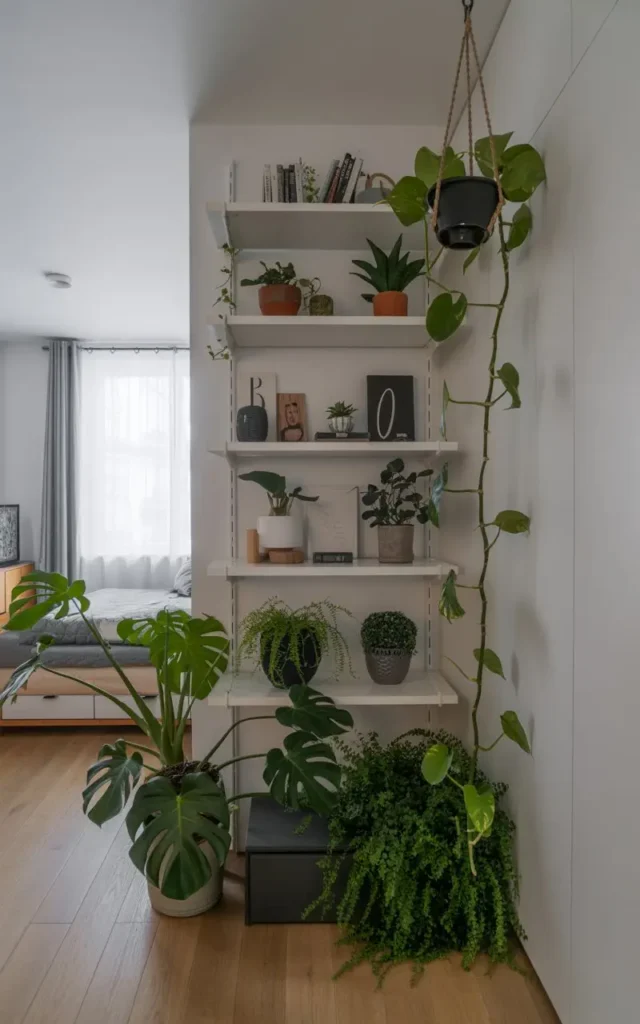
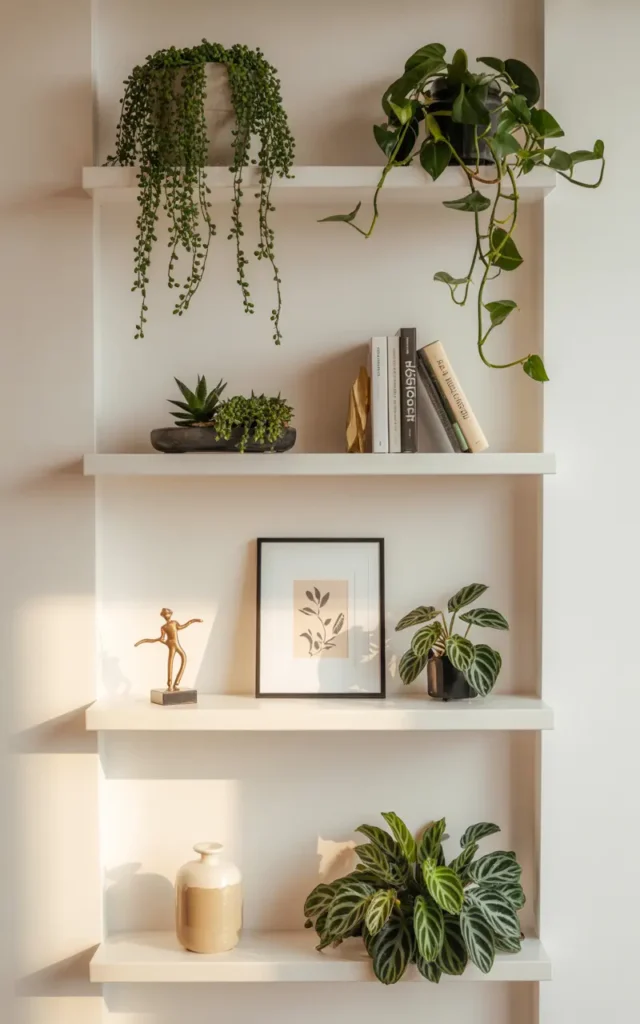
Layer 3 – Eye-Level (The Focal Point)
The eye-level layer (roughly 48-60 inches from the floor) is your gallery wall zone—the most visually important layer because it’s where your gaze naturally rests when standing or walking through your space. This layer should feature your most interesting specimens and strongest design moments.
Mix wall-mounted planters with framed botanical artwork, mirrors, and shelving. The key is creating visual weight distribution that feels balanced without being symmetrical. A large wall-mounted planter on the left might be balanced by a grouping of three smaller frames on the right.
Eye-Level Elements:
- Wall-mounted ceramic planters with tropical plants
- Macramé hangers with pothos or philodendron
- Floating shelves with 4-6 inch pots
- Framed pressed botanicals or prints
- Woven wall baskets with trailing plants
Keep 30-40% of your eye-level zone as negative space. This breathing room prevents the “busy” look and allows each element to shine.
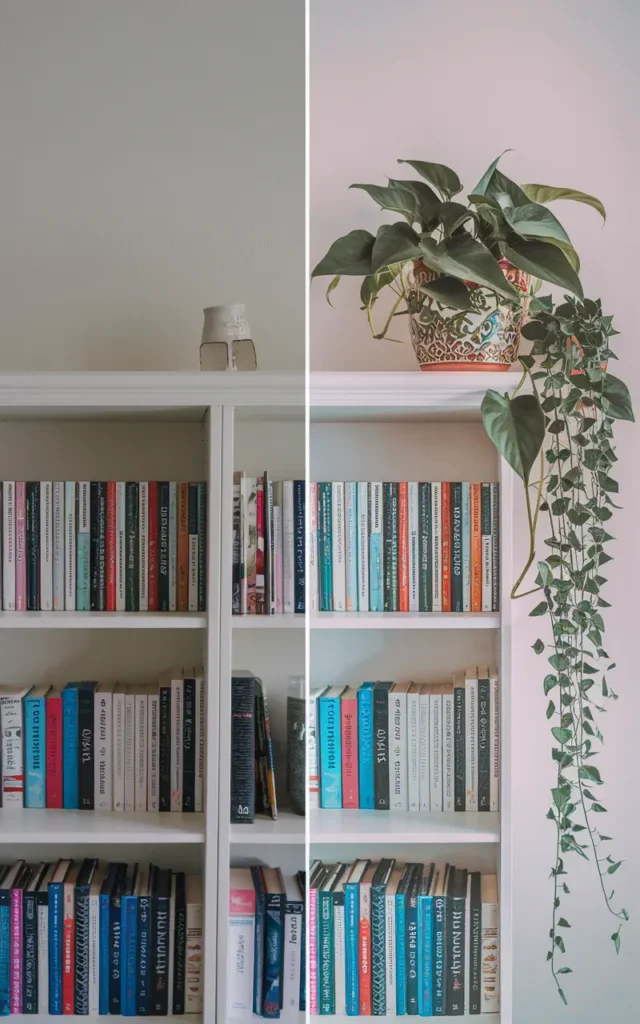
Layer 4 – Upper Canopy (Trailing & Climbing)
The upper canopy layer creates the “ceiling” of your botanical bento, typically starting around 6 feet and extending to your actual ceiling. This layer consists primarily of trailing and climbing plants that cascade downward, softening the hard edges of walls and creating movement in your design.
Perfect Upper Canopy Plants:
- Pothos: Fast-growing, low maintenance
- String of Pearls: Unique texture, drought tolerant
- Philodendron scandens: Heart-shaped leaves, vigorous grower
- String of Hearts: Delicate, romantic vining
- English Ivy: Classic cascading form (keep away from pets)
Use ceiling hooks, top-of-bookcase placement, and high shelving. Consider growth rate when planning—pothos can grow several feet per year, so give them space to trail without overwhelming nearby plants.
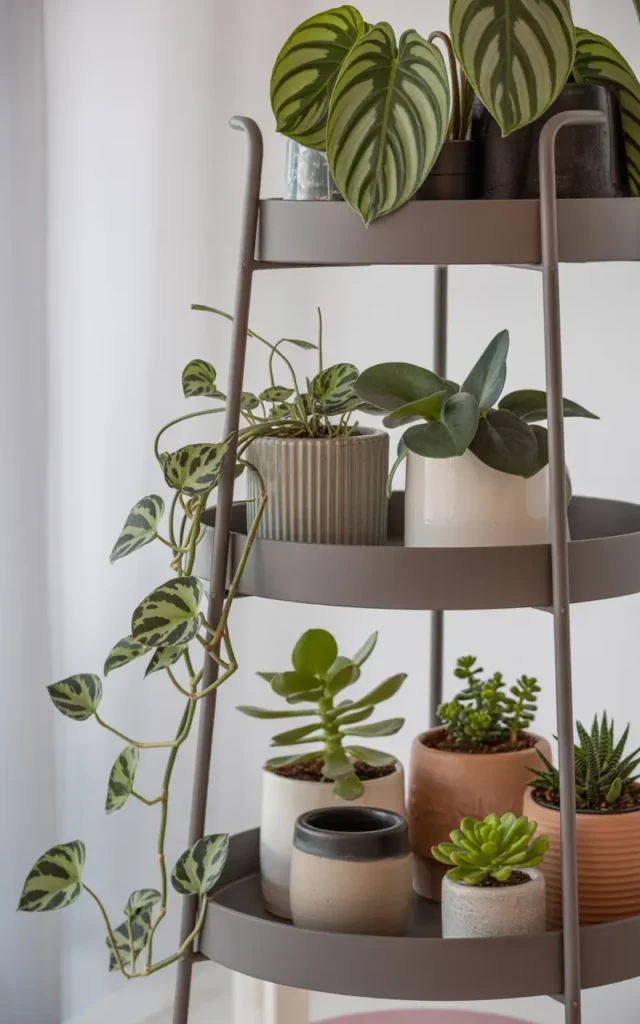
Layer 5 – Micro-Zones (Accent Containers)
The final layer consists of small accent pieces—the “garnish” in your botanical bento. These are typically 2-4 inch containers: terrariums, propagation stations, tiny succulents, seasonal displays, and decorative air plants.
Micro-zones add whimsy and personality without requiring significant space. Cluster 2-3 micro-zone elements on coffee tables, bathroom counters, bedside tables, or floating shelves within your larger zones.
Micro-Zone Ideas:
- Glass terrariums with moss and ferns
- Propagation stations in vintage bottles
- Succulent arrangements in ceramic bowls
- Seasonal bulb displays (paperwhites in winter, tulips in spring)
- Air plant displays on driftwood or in hanging glass orbs
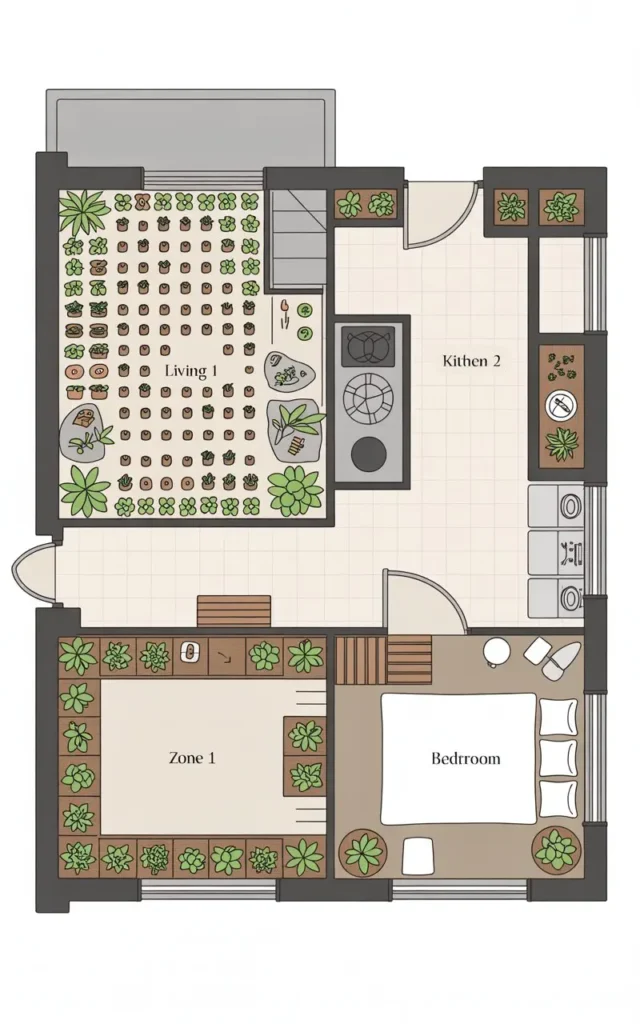
Creating Your Botanical Bento Zones
The 3-Zone Apartment Layout
Rather than treating your entire apartment as one continuous plant space, divide it into three distinct botanical zones, each with its own character and plant selection strategy.
Zone 1: Living/Display Area (High Light, Decorative Focus)
This is your showpiece zone—typically your living room or main gathering space. Lighting is generally bright due to large windows, and the focus is on creating an impressive visual impact. This zone can handle your most dramatic plants and most ambitious layering.
Plant selection priority: visual wow factor, statement pieces, conversation starters. Include all five layers, with emphasis on ground floor drama and eye-level focal points.
Zone 2: Kitchen/Functional Area (Herbs, Edibles, Practical)
Your kitchen zone prioritizes functionality while maintaining the bento aesthetic. Bright windowsills become herb gardens. Countertops host propagation stations. Open shelving integrates small edible plants among your dishes.
Plant selection priority: herbs (basil, mint, thyme), compact edibles (cherry tomatoes, lettuce), functional air-purifiers. Focus on layers 2, 3, and 5—ground floor plants may crowd valuable cooking space.
Zone 3: Bedroom/Quiet Area (Air-Purifying, Low-Light Tolerant)
Your bedroom zone emphasizes calm and air quality. Plants should feel soothing rather than stimulating, with emphasis on known air-purifying varieties. This zone often has lower light levels, requiring shade-tolerant species.
Plant selection priority: snake plants, peace lilies, pothos, ZZ plants. All layers work here, but keep ground floor minimal to avoid crowding sleeping space.
Light-Based Zoning Strategy
Before arranging any plants, map your apartment’s light levels. Download a light meter app (many are free) and measure foot-candles or lux in different areas throughout the day. This data-driven approach prevents the common mistake of placing sun-loving plants in dim corners.
Light Level Guidelines:
| Light Level | Lux Range | Best For | Example Locations |
|---|---|---|---|
| High/Direct | 10,000+ lux | Cacti, succulents, herbs, flowering plants | South-facing windows, balconies |
| Bright Indirect | 2,500-10,000 lux | Monstera, pothos, most tropicals | Within 3-5 ft of windows |
| Medium | 1,000-2,500 lux | Snake plants, philodendron, ZZ plant | North-facing windows, 6-8 ft from bright windows |
| Low | 500-1,000 lux | Pothos, snake plant, peace lily, cast iron plant | Interior rooms, corners, bathrooms |
Match plants to your measured light levels rather than trying to force high-light plants into dim spaces. This ensures health and reduces maintenance frustration.
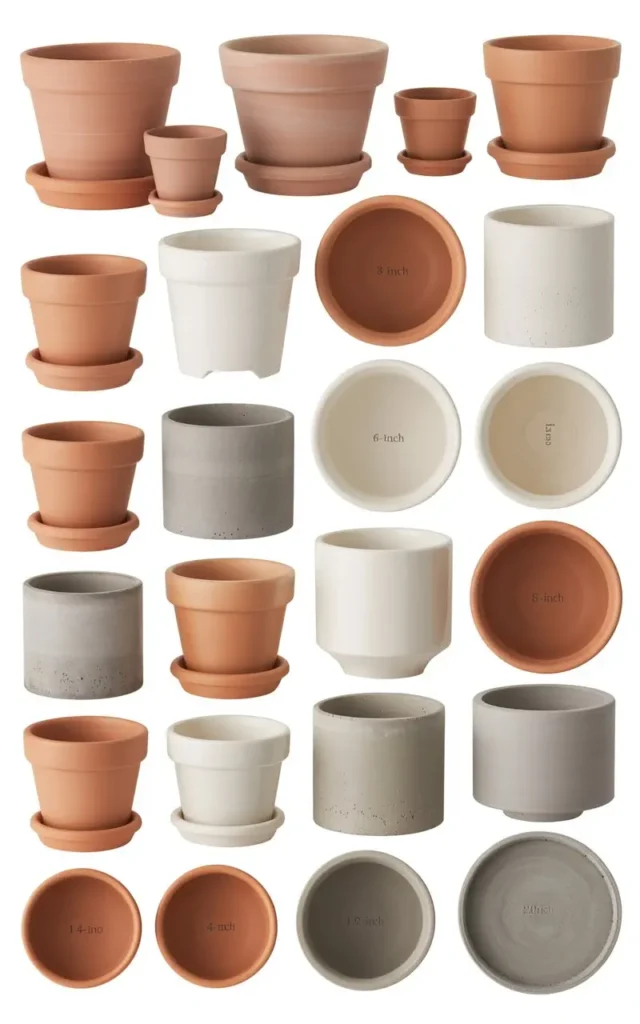
Color Palette & Pot Selection for Cohesion
The 60-30-10 Rule for Plant Styling
Professional interior designers use the 60-30-10 rule for color balance, and it works perfectly for botanical bento design. This principle prevents the “too many cooks in the kitchen” look of accumulated mismatched pots while allowing personality and visual interest.
60% Neutral Foundation Your dominant pot color should be neutral: terracotta, white, off-white, concrete gray, or natural materials like bamboo or seagrass. These pots form the backbone of your collection and create visual calm. They recede slightly, allowing the plants themselves to be the stars.
30% Accent Color Choose one or two accent colors that coordinate with your overall decor. This might be matte black for industrial spaces, sage green for bohemian vibes, or navy blue for coastal aesthetics. Use these pots strategically at focal points—particularly in the eye-level layer.
10% Statement Pieces Reserve a small percentage of your collection for special, eye-catching containers: a vintage ceramic planter, a geometric metal stand, handcrafted pottery with unique glazing. These should feel intentional rather than random—use them for your very best plants or in positions where they’ll be appreciated up close.
Container Styles That Support the Bento Aesthetic
Consistency in container style—even across different colors—helps maintain the organized, intentional bento look. Choose either predominantly geometric shapes (cylinders, cubes, hexagons) or organic forms (rounded, irregular, handmade-looking), but avoid mixing both styles equally within the same zone.
Material Consistency Tips:
- Modern aesthetic: Focus on ceramic, metal, and concrete
- Bohemian aesthetic: Emphasize terracotta, woven baskets, and macramé
- Scandinavian aesthetic: White ceramic, light wood, and minimal black accents
- Industrial aesthetic: Metal, concrete, and Edison-style hanging planters
Plant Combinations for Each Layer
Foolproof Ground Floor Trios
Creating successful plant groupings is easier when you consider both aesthetic variety and care compatibility. These ground floor combinations are tested winners:
Trio #1: Low-Maintenance Drama
- Monstera deliciosa (left): Large fenestrated leaves, 6-8 feet
- Snake Plant (center): Vertical architectural form, 3-4 feet
- ZZ Plant (right): Glossy upright stems, 2-3 feet
Care compatibility: All three tolerate low light, infrequent watering (every 1-2 weeks), and neglect. Visual contrast between monstera’s horizontal spread, snake plant’s vertical thrust, and ZZ’s compact habit creates dimension.
Trio #2: Height Variation Mastery
- Fiddle Leaf Fig (back left): Tall, branching form, 8-10 feet
- Rubber Plant (back right): Bold glossy leaves, 6-8 feet
- Dracaena marginata (front center): Spiky, palm-like, 4-6 feet
Care compatibility: All prefer bright indirect light and moderate watering. The staggered heights create visual depth, while the contrasting leaf shapes (large and smooth vs. spiky and narrow) add interest.
Spacing note: Ground floor trios should span 8-12 feet of linear space with 3-4 feet between plants to avoid crowding.
Mid-Level Mix Ideas
The mid-level layer is where texture play becomes crucial. Combine smooth with textured, broad with delicate, upright with slightly trailing.
Texture Play Combination:
- Calathea ornata (back): Pin-striped patterned leaves, upright habit
- Marble Queen Pothos (middle): Variegated heart-shaped leaves, slight trail
- Peperomia obtusifolia (front): Thick, glossy, rounded leaves, compact
Visual impact: The calathea’s linear pattern contrasts with the pothos’s organic variegation, while the peperomia’s solid green provides a visual rest. The slight height variation (12″, 10″, 8″) creates subtle depth.
Color Harmony Combination:
- Philodendron ‘Brasil’ (left): Heart leaves with lime variegation
- Tradescantia zebrina (center): Purple-and-silver striped trailing leaves
- Satin Pothos (right): Dark green with silver dappling
This combination works in medium light and creates a cohesive purple-silver-lime color story that feels intentional.
Upper Canopy Plant Pairings
When pairing upper canopy plants, consider growth rates and maintenance access. Fast growers like pothos may overwhelm slower-growing string of hearts if planted side-by-side.
Balanced Canopy Duo:
- Golden Pothos (left side): Fast grower, can trail 8+ feet annually
- String of Hearts (right side): Moderate grower, more delicate appearance
Maintenance tip: Place fast growers where you can easily trim them back seasonally (over sinks, above tubs). Position delicate growers in areas where they won’t require frequent handling.
Styling Secrets from Botanical Bento Masters
The “Negative Space” Principle
The most common mistake in botanical bento design is overcrowding. True bento mastery comes from restraint—knowing when to stop adding plants.
Apply the 60% filled, 40% breathing room rule to each zone. If your living room plant zone spans a 10-foot wall, only 6 feet should contain plant displays, with 4 feet of open space (wall art, furniture, or simply blank wall) providing visual rest.
This negative space serves multiple purposes:
- Allows each plant grouping to be appreciated individually
- Prevents the “cluttered” look that undermines the organized bento aesthetic
- Creates visual flow that guides the eye through your space
- Makes maintenance access easier
Practical application: When styling a shelf, leave at least one-third of shelf space empty. On a five-shelf bookcase devoted to plants, two shelves should have no plants at all, displaying books, art objects, or remaining completely clear.
Adding Non-Plant Elements
Strategic non-plant elements act as “dividers” between your botanical bento compartments, much like the partition walls in an actual bento box separate rice from pickles.
Effective Divider Elements:
- Books: Stacks or vertically shelved books between plant groupings
- Sculptural objects: Ceramic pieces, small statues, abstract forms
- Framed art: Botanical prints, photographs, mirrors
- Textiles: Small woven baskets, macramé pieces, decorative boxes
- Functional items: Beautiful watering cans, vintage glass bottles, wooden stands
The key is selecting pieces that complement your plants’ aesthetic without competing for attention. In a minimalist Scandinavian bento, choose simple wooden objects and black-framed line drawings. In a bohemian bento, embrace colorful textiles and eclectic pottery.
Seasonal Rotation Strategy
One of the brilliant advantages of botanical bento’s compartmentalized approach is the ease of seasonal updates. Rather than overhauling your entire plant collection, refresh your micro-zones quarterly to keep your design feeling current.
Spring Rotation (March-May)
- Replace winter micro-zones with forced bulbs (tulips, paperwhites, hyacinths)
- Add herb propagation stations in kitchen zone
- Introduce fresh growth foliage in brighter greens
Summer Rotation (June-August)
- Swap micro-zones for outdoor-friendly succulents that can move to balconies
- Add flowering plants (African violets, begonias) to eye-level focal points
- Rotate sun-loving plants to brightest spots
Fall Rotation (September-November)
- Introduce seasonal foliage (colorful crotons, autumn-toned calatheas)
- Add cozier micro-zone elements (moss terrariums, dried botanical displays)
- Transition outdoor plants back to indoor positions
Winter Rotation (December-February)
- Focus on air-purifying plants for indoor air quality during closed-window months
- Add holiday-appropriate micro-zones (amaryllis, Christmas cactus)
- Emphasize evergreen and low-light tolerant varieties as natural light decreases
Maintenance Made Easy with Zone-Based Care
Creating a Zone Care Schedule
The botanical bento system transforms overwhelming plant maintenance into a manageable routine. By grouping plants with similar needs within zones, you can develop efficient care schedules.
Sample Weekly Care Routine:
Sunday: Ground Floor Layer
- Check soil moisture 2-3 inches deep
- Water if dry (typically every 7-10 days for most)
- Rotate pots 90° for even growth
- Wipe large leaves with damp cloth
- Time investment: 15-20 minutes
Tuesday: Mid-Level Layer
- Check moisture of top inch of soil
- Water if dry (typically every 5-7 days)
- Prune dead leaves or leggy growth
- Time investment: 10-15 minutes
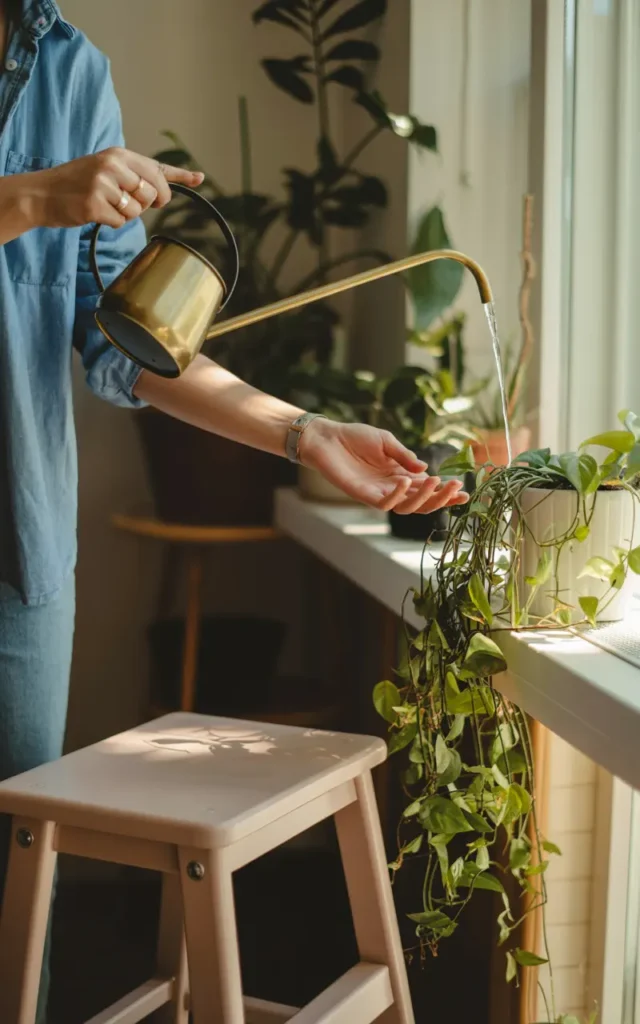
Thursday: Upper Canopy Layer
- Water trailing plants (they dry faster with increased air circulation)
- Trim excessive vining growth
- Check for pests on undersides of leaves
- Time investment: 10 minutes
Saturday: Micro-Zones & General
- Water micro-zone elements as needed
- Mist humidity-loving plants
- Refill propagation stations
- Fertilize (during growing season, every 2-4 weeks)
- Time investment: 10 minutes
Tools for Each Layer
Having the right tools for each layer reduces maintenance frustration and time.
Ground Floor Tools:
- Long-spout watering can for reaching under large leaves
- Soil moisture meter (6-8 inch probe for deep pots)
- Microfiber cloths for leaf cleaning
- Plant rotation mat or furniture sliders for heavy pots
Mid-Level Tools:
- Small watering can with precision spout
- Pruning shears for deadheading and trimming
- Spray bottle for misting
- Shelf liner to protect furniture surfaces
Upper Canopy Tools:
- Long-reach watering wand (3-4 foot extension)
- Step stool or ladder
- Plant pulley systems for lowering hard-to-reach hanging plants
- Twine or plant clips for training growth
Micro-Zone Tools:
- Eyedropper or small squeeze bottle for precise watering
- Tweezers for removing dead material from terrariums
- Small paintbrush for cleaning succulent leaves
- Turkey baster for removing excess water
Product recommendations: Include affiliate links to quality tools like “Haws Indoor Watering Can”, “Dr. Meter Soil Moisture Tester”, and “Fiskars Micro-Tip Pruning Snips”
Troubleshooting Common Zone Issues
Problem: Upper Layer Drying Out Too Fast
Causes: Increased air circulation near ceiling, heat rising from below, smaller pot sizes
Solutions:
- Switch to self-watering planters for trailing plants
- Use moisture-retaining soil amendments (coco coir, vermiculite)
- Group hanging plants together to create microclimate
- Install small humidifier nearby during dry months
- Choose more drought-tolerant trailing plants (string of pearls vs. ferns)
Problem: Ground Floor Overwatering
Causes: Large pots retain moisture longer, poor drainage, overzealous watering
Solutions:
- Invest in moisture meters—don’t guess
- Ensure all pots have drainage holes and saucers
- Add perlite or orchid bark to soil mix (20-30% by volume)
- Bottom-water by placing pots in tub or sink for 30 minutes
- Adjust watering frequency seasonally (plants need less water in winter)
Problem: Mid-Level Pests (Spider Mites, Mealybugs)
Causes: Dry indoor air, plant stress, new plant contamination
Solutions:
- Quarantine new plants for 2 weeks before integrating
- Weekly leaf inspections, especially undersides
- Increase humidity with pebble trays or humidifiers
- Treat early with insecticidal soap or neem oil
- Isolate affected plants immediately to prevent spread
Budget-Friendly Botanical Bento Starts
The $100 Starter Kit
Creating a botanical bento doesn’t require a fortune. Here’s a strategic shopping list that gives you a complete single-zone design for under $100:
Ground Floor (3 plants) – $40
- 1 x Monstera deliciosa (6″ pot) – $20 at local nursery
- 1 x Snake plant (6″ pot) – $12
- 1 x Pothos (6″ pot, will grow into ground floor size) – $8
Mid-Level (5 plants) – $30
- 2 x Pothos varieties (4″ pots) – $12
- 1 x Calathea or Peperomia (4″ pot) – $8
- 2 x Succulents or small philodendrons (3″ pots) – $10
Upper Canopy (2 plants) – $12
- 2 x Pothos or Philodendron scandens (4″ pots, for hanging) – $12
Containers – $18
- Keep nursery pots for ground floor initially (free)
- 5 x Matching ceramic pots for mid-level (4-5″) – $15 at discount stores
- 2 x Basic hanging planters – $3 each at craft stores
Total: $100
Shopping Strategy Tips:
- Visit local nurseries on clearance days (often Mondays or after weekends)
- Check Facebook Marketplace and Craigslist for plant swaps and giveaways
- Buy smaller plants and let them grow—most plants double in size within a year with proper care
- Start with one zone, perfect it, then expand
DIY vs Store-Bought Plant Stands
Plant stands can be expensive, but creative DIY solutions can achieve the same botanical bento effect for a fraction of the cost.
IKEA Hacks for Tiered Displays:
- BEKVÄM spice racks ($4 each): Mount on walls as narrow plant shelves
- BEKVAM step stool ($20): Flip upside-down for unique tiered stand
- MARIUS stools ($6 each): Stack at varying heights for ground floor elevation
- RASKOG cart ($30): Creates mobile three-tier plant display
Thrifted Furniture Repurposing:
- Vintage wooden ladders: Lean against wall, place plants on rungs
- Old wooden crates: Stack and secure for industrial-style tiered display
- Vintage suitcases: Open and stand on edge for quirky plant pedestals
- Wooden chairs: Place plant on seat, smaller pots on rungs below
- Wicker baskets: Flip upside-down for boho-style plant elevators
DIY Concrete Pedestals: Mix concrete (8 lbs for $6), pour into PVC pipe molds ($3), cure 48 hours, and sand smooth. Total cost: ~$10 for 3 pedestals vs. $30-50 each at stores.
Inspiration Gallery: Real Apartment Botanical Bentos
Minimalist Scandinavian Bento
Imagine a sun-drenched studio apartment with white oak floors and floor-to-ceiling windows. The botanical bento here emphasizes restraint and natural materials. Ground floor features a single dramatic fiddle leaf fig in a large white ceramic pot positioned in the corner. Mid-level consists of four plants on light wood floating shelves—all in matching white pots with clean lines. Upper canopy includes two trailing pothos in woven hanging baskets, their vines extending no more than three feet to maintain the minimalist aesthetic. Micro-zones are limited to a single glass terrarium on the coffee table. The overall effect is zen, airy, and uncluttered—proof that botanical bento works with “less is more” philosophies.
Key Elements: 60% white pots, 30% natural wood accents, 10% glass terrariums; maximum 12 plants total; abundant negative space; all-green foliage palette with no variegation
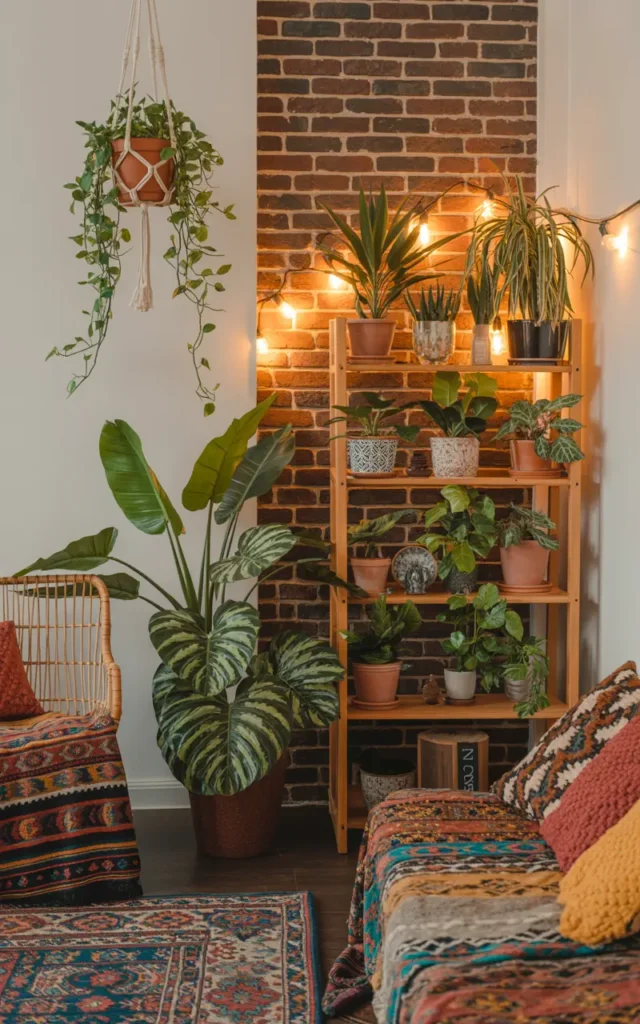
Bohemian Maximalist Bento
This style proves that botanical bento isn’t just for minimalists. Picture a vintage apartment with exposed brick, jewel-toned textiles, and eclectic furniture. The bento structure remains—distinct layers and zones—but the execution is rich and layered. Ground floor explodes with color: a burgundy rubber plant, a variegated monstera, and a prayer plant with pink undersides. Mid-level shelves burst with variety in mismatched vintage pots (adhering to a warm earth tone palette that creates cohesion). Upper canopy includes string of pearls, purple tradescantia, and variegated string of hearts, creating a cascading tapestry. Micro-zones feature colorful succulents in hand-painted pots, terrariums with colored glass, and a vintage brass watering can that doubles as decor. The key is that despite the variety, the bento structure prevents chaos—each element occupies an intentional zone.
Key Elements: Warm earth tone pot palette (terracotta, rust, mustard, sage); mixture of trailing, variegated, and colorful foliage; vintage and handmade containers; textiles integrated between zones
Modern Industrial Bento
An urban loft conversion with concrete floors, exposed ductwork, and steel windows. The botanical bento here leans into architectural drama. Ground floor plants are positioned in sleek black concrete planters—monstera, snake plants, and a dramatic bird of paradise arranged as a living sculpture. Mid-level utilizes geometric metal plant stands (black and copper), creating striking silhouettes. Eye-level features wall-mounted metal shelving with plants in matte black pots. Upper canopy plants hang from industrial ceiling pipes in minimal black hanging planters. Micro-zones incorporate air plants on geometric metal stands and small succulents in concrete cubes. The plant selection favors architectural forms—snake plants, ZZ plants, rubber plants—with bold, graphic shapes that complement the industrial aesthetic.
Key Elements: Matte black and copper accents; concrete and metal containers; architectural plant forms; dramatic shadows and angles; minimal color palette

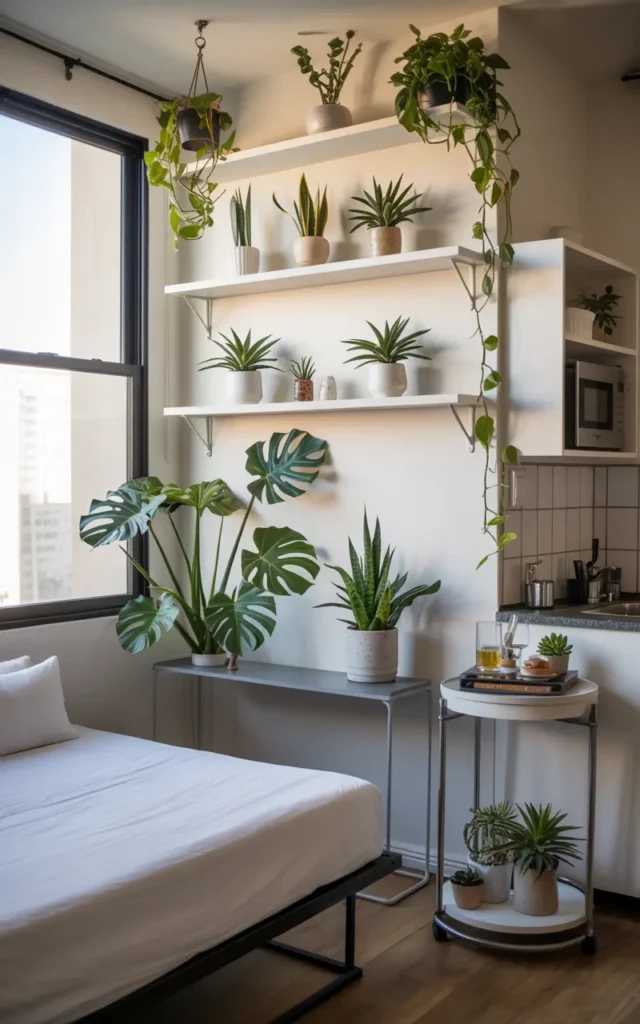
Small Studio Apartment Bento
The ultimate test of botanical bento principles: a 400-square-foot studio where every inch counts. The single-zone design maximizes vertical space through clever layering. A narrow console table against one wall becomes the ground-floor base, topped with a manageable-size monstera (kept pruned to 4 feet). Above it, a vertical arrangement of three floating shelves holds the mid-level collection, each shelf featuring 2-3 small plants in matching white pots. The eye-level layer integrates with existing furniture—plants positioned on the kitchen counter, bathroom shelf, and nightstand, creating distributed focal points throughout the studio. Upper canopy consists of one strategically placed trailing pothos above the Murphy bed, which visually softens the ceiling when the bed is up. Micro-zones are mobile: small succulents on a rolling bar cart that can be moved as needed. The genius is in the multi-functionality—the botanical bento integrates seamlessly with necessary furniture and storage, proving you don’t need square footage for organized plant beauty.
Key Elements: Vertical emphasis; multifunctional furniture integration; mobile elements; small-scale plants; single cohesive zone spanning entire studio; space-saving solutions
Conclusion
Botanical bento design transforms the overwhelming chaos of apartment plant parenting into an art form. By applying the Japanese bento philosophy of intentional compartmentalization, organized layers, and thoughtful balance, you create a living space that’s both lush and serene—maximalist in plant quantity but minimalist in execution.
The beauty of this system lies in its scalability. Whether you’re working with a 400-square-foot studio or a spacious loft, whether your budget is $100 or unlimited, the principles remain the same: define your zones, establish your five layers, respect negative space, and choose plants that share care requirements within each zone.
Start small. Transform one corner, perfect one zone, master the layer system with a dozen plants before expanding. The botanical bento isn’t built in a weekend—it’s a living design that evolves with your confidence, your plant collection, and your personal style.
Which layer will you start with? Will it be a dramatic ground-floor monstera anchoring your living room corner? A carefully curated mid-level collection on new floating shelves? Or perhaps an upper canopy installation that makes your ceiling a cascade of trailing greenery? Whatever you choose, remember: the goal isn’t perfection, it’s intentionality. Every plant in its place, every zone with purpose, every layer contributing to a composed botanical masterpiece that brings you joy every single day.
Ready to dive deeper? Explore our related guides:
- 15 Innovative Vertical Garden Solutions for Urban Spaces
- Vertical Gardening for Small Spaces: Transform Your Limited Area
- Best Plants for Vertical Gardens: Complete Guide
- Watering Container Plants: Your Ultimate Guide to Thriving Apartment Gardens
- Apartment Gardening for Beginners in 5 Great Tips
- Keeping Your Vertical Garden Thriving All Year
Transform your apartment from plant chaos to botanical bento—one intentional layer at a time.